Friday, July 30, 2010

Works in Progress

I've been so busy this week cutting & cutting & cutting lots of beautiful fabric!

I just wanted to show off all the work that I've been doing even though it's not done it is well on it's way. I hope things continue going smoothly so I can get these items sewn up quickly!

Above is batik fabric, PUL, & stabilizer fabric all cut out & ready to be sewn for a new wholesale order.

Above is 2 Spongebob aprons & a small tote bag.

Above is 3 Dora aprons & a small tote bag.

Monday, July 26, 2010

Writers Block

I'm sorry for the lack of quality posts lately. I've been suffering from a severe case of writers block! But I hope to be cured, for awhile at least.


I have also been extremely busy.

My husband returns home tomorrow after being gone for pretty much all of June and July for military training and classes. He was home for a week around the 4th of July and got to come home a few time in the month of June. This is the first stage of his deployment readiness training. He will be deploying at the end of 2011 for an 18 month period. I am not looking forward to it. He is a communications specialist and has been learning all about servers this go round. June was about learning them and July has been putting his knowledge into action. I'm sure I'm leaving a lot of info out of what he is actually doing with the servers as I don't pretend to understand nor am I allowed to know fully everything. I'm sure some of what he is learning is classified so I don't ask. This past couple months he has been stationed at Fort Lenardwood which is in our home state of Missouri so his travel time will be short to get back home to us! Unfortunately, he will be going back out of town August 20th for Fort Drumm in upstate New York and he'll be gone for a full 2 and a half months. These are the joys of being a military family…

Because Justin is gone so much I have more responsibilities on my shoulders. Although, I don't do as much cooking or cleaning, I do have to act as 2 parents and take on other household things my husband usually does. Sometimes I get stressed and overwhelmed. The other day I came across a very encouraging blog post at Simple Mom, 6 Military Mom Tips for Flying Solo. These are great tips for any mom whose husband travels a lot not just military moms.

But aside from Justin being gone…

Ian has been busy taking apart any and all his toys and rebuilding them into new toys he calls RC cars. He is hooked on them and desperately wants a real one and because I refuse to shell out that kind of money he has decided to create his own. I don't know how many times I've told him to stop taking things apart. *Sigh* I just hope he puts this knowledge to good use some day and becomes an engineer of some sort. My dad is an electrical engineer and my little brother is a mechanical engineer so it's in his blood. Until then, I suppose I'll just have to deal with his room looking like a parts store. I'm glad we have doors that I can close!


Jameson has been a busy little bee too! He has cut all 4 of his top center teeth at once. My goodness, that was fun! (Note my sarcasm!) He is, however, finally sleeping through the night from 7pm-ish to 7am , plus a 2 or so hour nap in the middle of the day. He is still 'army crawling' and getting around very quickly that way but he has added cruising to his modes of transportation. I have a feeling he'll walk early like Ian did at 11 months. He has also fully weaned himself. It wasn't my intention for him to wean at 9 1/2 months but that's just what happened. I'm actually very thankful because I was getting very stressed out over it and now I feel much more relaxed which makes it easier for me to deal with all the other stresses.


I have also been doing tons of sewing. Or I have been trying to! I will post more about what I've made in future posts. Sewing definitely takes my mind off my troubles. But this post is long enough as it is.

I hope you all have been having a great summer so far!
~Heather

Thursday, July 15, 2010

Lily's From My Garden

The lily's are now all done blooming in my garden. They are one of my favorite flowers. While they were blooming I went out and got a few pictures of them and wanted to share with you all. Enjoy!


Wednesday, July 14, 2010

My Dream Vacation

Where would I go on my dream vacation? That's a very good question considering that I've traveled the United States pretty extensively. I've been to both coasts, the Grand Canyon, Yellowstone, the Bahamas, Mexico, and pretty much everywhere in between. Everywhere has had it's advantages and disadvantages. As time goes on I have learned that I don't really like large crowds or big cities. So trips to places like New York City wouldn't be very fun for me! I prefer natural places and I absolutely loved Yellowstone (although I was almost 8 months pregnant when we visited so I took it really easy). The photos below are from last years vacation.


But, what would my dream vacation be? It would probably involve a nice, cold glass of iced tea, a lounge chair, my backyard, and my family. What more could one ask for?

Monday, July 12, 2010

Apple Butter

Ingredients:

Apples- enough to make approx 7 cups of applesauce; I think I used 15-20 of these small/medium apples
2 cups apple cider- I couldn't find any so I used apple juice & instead increased the spices
1.5 cups honey *I like this recipe because it uses honey (a natural sugar) instead of regular sugar
1 tsp (or more) ground cinnamon
1/2 tsp ground cloves
1/2 tsp allspice

Directions

Gather your apples and wash them.

Peel, core and quarter the apples.

Put the apple slices in your crockpot with the apple cider (or apple juice).

Cook them until they are tender. I cooked them for 2 or 3 hours on low. You have essentially just made applesauce. You can stop here if you want but you may want to sweeten them to taste.

Add the rest of your ingredients and cook on low for 14 to 15 hours or until the mixture is dark brown.

You can now either freeze it or can it. This batch I put in the freezer because I ran out of time.

To can:
Pack while hot into hot pint jars.

Process in hot water bath for 10 minutes, counting the time after the jars have been immersed and the water returns to a rolling boil.
-OR-
Process pints and jars at 5 pounds pressure in the pressure canner for 5 minutes.


When cool, test for a proper seal. Remove bands and store in a cool dry place.

Thursday, July 8, 2010

Strawberry Wine


Someone sent me a link to this YouTube video. I thought it was really appropriate to include it here.
Strawberry Wine by Deana Carter


Justin and I have gotten interested in making homemade jellies, preserves, etc. so it wasn't too much of a stretch to add wine making in to our interests. Our first attempt at wine making went well although on a small scale. We have since started making larger batches and this recipe is for a larger 5 gallon batch.

We used 10 pounds of strawberries. They were on sale at the store and we only spent $15 for all of them.

We also used 6 pounds of sugar, 3 gallons of water, and 1 1/2 packages of yeast. We were just going to use 1 package but I had a half one left over so we just added it to use it up before it went bad. Having a kitchen scale to weigh everything is also really helpful.

We put everything in one of those 5 gallon water cooler containers. We first disinfected it with a tiny bit of bleach and hot, hot water.

With the sugar, make a simple syrup. To do this you need to use part of your water, I believe we used 2 quarts and 1 pound of sugar, heated it up on the stovetop until dissolved. Don't boil it! We repeated the process until all the sugar was dissolved & poured into the water cooler. We also dissolved the yeast in about a cup of warm water and put it in the water cooler.

Pour the remaining water in the water cooler. You should now have everything in there but the strawberries. It's not necessary to do it this way. You can put the strawberries in there first if you want but this is just the way we did it.

Add the strawberries. Justin and I tag teamed and got through them pretty quickly. I removed the tops, Justin quartered and weighed them, and I put them in the water cooler.

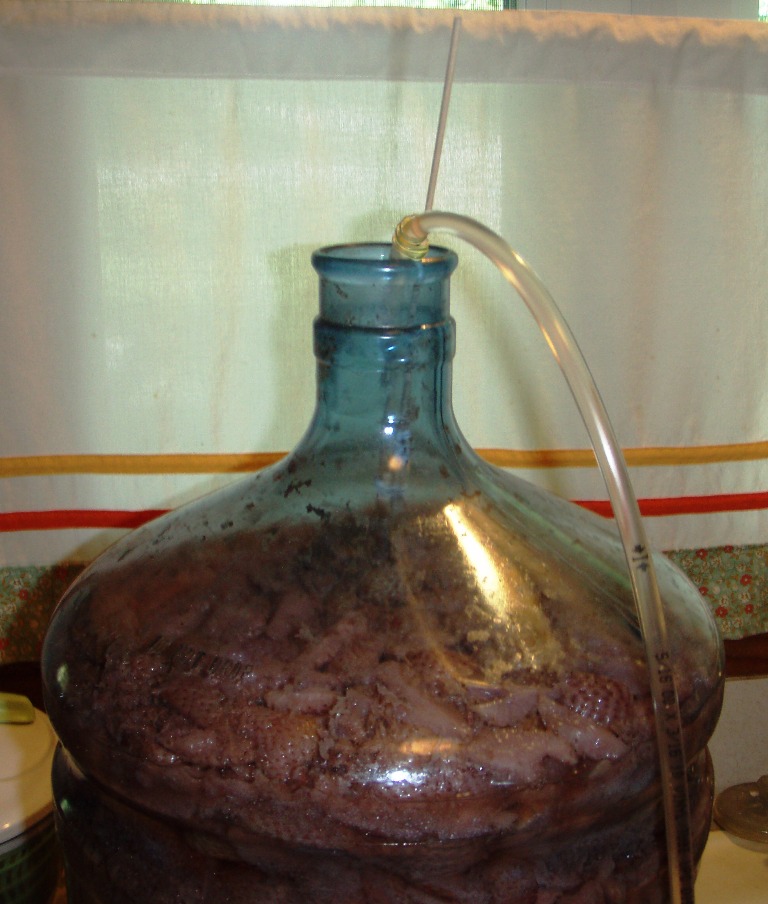
Now here is the important part. The water cooler needs to seal properly so air isn't introduced to the wine which could potential spoil it before the sugars and yeast can break down the fruit in to wine. Justin saved the water cooler lid, poked a hole in it & glued a clear tube in to the top of it. The long end of the tube sticks out of the top & only about a half an inch is on the inside. The tube is actually the kind you can buy at the fish aquarium store, unused of course. The glue is JB weld, whatever that is, I'm sure hot glue would work just as well. Anyways, you'll also need a jar of some sort with some holes poked in the top. Fill the jar with water & put the tube in there. As the sugars & yeast break down the fruit it will bubble & release gases. Putting the tube in the water will keep oxygen from being introduced & keeping you from making vinegar! There is a lot of science behind it that has really interested Justin. I just like the end product!

Now you have to set it aside and wait. We put in the the basement where it's cool and out of direct sunlight. We started the wine on May 29, 2010 and it was finished on June 28, 2010. You will know it's done when there are no more bubbles being released.

I have collected and saved wine bottles for the purpose of reusing them for the wine we make. They are cleaned and have the labels removed.

To get the wine out is fairly simple. Justin twist tied several wooden skewers together, enough to be tall enough to reach the bottom. Then he twist tied another clear tube all along the skewers so that the end of the tube is near the bottom of the water cooler. The fruit usually floats so this is the best way of doing it & saves you the extra step of needing to filter the wine.

Then you can suck the air out of the tube and put the end of the tube in your clean wine bottles to be filled. Gravity will do the rest of the work for you. You just need to make sure you don't accidentally overfill the bottles because you weren't paying attention. (Guilty!)


As the wine gets lower in the water cooler you may have to raise it up higher so gravity will continue working for you. You can see the tube going down inside better in this photo too.

Once you're done, seal them up! We got 8 and a half 1.5 liter wine bottles of strawberry wine!

And don't forget to enjoy a glass while you're at it!

Wednesday, July 7, 2010

New Product! Fleece Diaper Covers! Now Available in Hen and Chick Cloth!!!

These have been a long time coming!

They are made from anti-pill fleece and have a doubler soaker sewn into the wet zone.

Fleece makes great diaper covers because they are durable, soft and breathable. Fleece pulls moisture away from your baby's skin keeping them nice and dry. Toss the covers in with the rest of your cloth diapers when it's time to wash.

Check under the FLEECE DIAPER COVER section for pricing, selection, and more!


Garden Bouquet Quilt: Month 20- The Crocus

When Nancy told the members last week that the coming flower would be an early spring one the members were divided between the hepatica and the trailing arbutus. But Nancy said these flowers were both too small and fragile to appliqué easily. “I have picked a larger flower, one that will adapt itself to needlework. Can’t you think of a blossom which comes up, almost through the snow on your lawns and shows its head in yellow, in white or in purple?”

“Oh, you mean a crocus,” they chorused. “Crocus it is,” said Nancy.

It’s a good looking flower, too, when made in pale lavender and deeper figured purple or in yellows or even in yellow for one flower and lavender for the other.

The leaves are long. For the first time there is no stem shown. Instead we have three leaves, developed in fast color soft green material. Choose something which will wash and take stitchery easily.

These leaves and flowers are appliquéd onto the large white triangle which is seamed to the equally large triangle of the pieced urn.

The club members could make these urns in short time, nowadays, since they had made nineteen of them. You see, each flower with its pair of admiring birds comes out of an urn. The combination of the triangle block of urn joined to the triangle block of white gives a large diamond block measuring 12 inches on each one of its four sides, when seamed and joined in the quilt.

The triangles are cut 12 ½ by 12 ½ by 17 ½. Then when seams are taken off the size is 12 by 12.

In making these flowers the club members followed the usual procedure.

First, they cut the picture with its accompanying directions from the paper.

Second, they traced the design lightly onto the white triangle as indicated by the small inset drawing.

Third, they made another tracing on lightweight cardboard.

Fourth, they put the original design for safe keeping in the Nancy Page scrap book.

Fifth, they cut out the various parts of the design which had been traced on the cardboard.

Sixth, they laid these on the material from which the flowers and leaves would be made.

Seventh, they cut out the material, allowing one-quarter inch on all sides for turning under raw edges.

Eighth, they turned under raw edges, basted and pressed the pieces.

Ninth, they pinned the pieces in place on the white triangle.

Tenth, they appliquéd them with a slanting, invisible hemming stitch.

The birds were appliquéd, and the next to the last block in the quilt was finished.

Supposing the members had been appliquéing the pieces with buttonhole stitch, then they would not have allowed the quarter inch since the buttonholing covers the raw edges.

Some members were making the quilt in outline stitch.

Others were filling in the outline spaces with colored crayons. Then this color was pressed with a hot iron which set the color.

The members who were doing this found that the effect was improved if the outline was worked with color fast embroidery cotton.


I haven’t been able to work on my block so I don’t have anything to show off. I will update this when I do get the chance!

Do you have any Garden Bouquet Quilt blocks to show off? Leave a link to your blog post about it in the comment section or email me a photo at heathers_custom_sewing{at}yahoo.com so I can share with everyone!

I hope you are enjoying this series!
~Heather


Quick Links to:

Month 1: Beginning Instructions, Urn, and Basket Instructions
Month 2, Part 1: The Tulip
Month 2, Part 2: The Saucy Bird
Month 2, Part 3: The Meek Bird
Month 3: The Cactus
Month 4: Lily of the Valley
Month 5: The Wild Rose
Month 6: The Trillium
Month 7: Canterbury Bells
Month 8: Nasturtium
Month 9: The Pansy
Month 10: The Tiger Lily
Month 11: The Primrose
Month 12: The Zinnia
Month 13: The Daffodil
Month 14: The Phlox
Month 15: The Poppy
Month 16: The Rose
Month 17: Balloon Flower
Month 18: Forget-Me-Not
Month 19: The Lemon Lily
~*~
Hand Appliqué
Machine Appliqué
Alternate Method of Appliqué Tutorial
Biased Binding Tutorial

Monday, July 5, 2010

Homemade Lemonade

Ingredients:


4 lemons
3/4 cup sugar
6 cups water
Ice cubes & lemon slices to serve

Directions:

Peel & quarter the lemons.

Put the lemons, sugar & 1 1/2 cups of water in a blender. Process for a few minutes until the lemons are finely chopped.

Pour the mixture through a strainer. Add the remaining water and stir well.

Add ice cubes and a few extra lemon slices before serving.

Saturday, July 3, 2010

The Meaning Behind the Shop Names

Heather's Custom Sewing got its shop name fairly easily. It's got my first name and the venue for which I work.


Hen and Chick Cloth got its shop name after several days of brainstorming. I needed something that would describe sewn items for mom and baby. My father-in-law had recently gotten some chicks which would grow in to egg laying hens. I took my inspiration from those chicks and my cloth diaper shop was born!

Total Pageviews